centos samba配置

centos samba配置小记

为windows 办公环境配置samba服务。特别是在配合本地硬盘映射的情况下,直接编译文档。操作方便。

基本更新

1
2
3
yum update
yum install epel-release
yum install wget curl vim

安装samba

1
2
3
yum install samba samba-server samba-common
systemctl start smb
systemctl enable smb

配置需求

部门通过账号登录共享服务器并访问部门共享(如创建ui部门和运维部门)。配置参考如下:

以部门创建用户

1
2
useradd ui -d /home/ui -s /usr/sbin/nologin -m
useradd ops -d /home/ops -s /usr/sbin/nologin -m

-d:指定用户目录
-s:指定登录shell(nologin禁止登录)
-m:无目录创建

给samba用户添加密码

1
2
pdbedit -a ui
pdbedit -a ops

pdbedit -a username:新建一个samba帐户
pdbedit -x username:删除一个samba帐户
pdbedit -L:列出samba帐户,读取passdb.tdb数据库文件
pdbedit -Lv:列出samba用户列表的详细信息
pdbedit -c “[D]” -u username:暂停该samba用户账号
pdbedit -c “[]” -u username:恢复该samba用户账号

pdbedit -Lv详细配置如图

pdbedit -Lv

更改samba配置文件

1
2
cp /etc/samba/smb.config /etc/samba/smb.config-backup
vim /etc/samba/smb.config

配置内容如下:

1
2
3
4
5
6
7
8
9
10
11
12
13
14
15
16
17
18
19
20
21
22
23
24
25
26
27
28
29
30
31
32
33
34
35
36
37
38
39
40
41
42
43
44
45
46
47
48
49
50
51
52
53
54
55
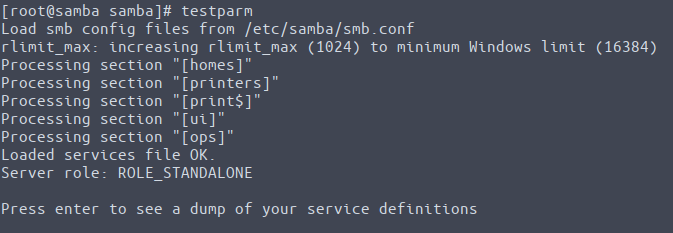
# See smb.conf.example for a more detailed config file or
# read the smb.conf manpage.
# Run 'testparm' to verify the config is correct after
# you modified it.

[global]
workgroup = SAMBA
security = user

passdb backend = tdbsam

printing = cups
printcap name = cups
load printers = yes
cups options = raw

[homes]
comment = Home Directories
valid users = %S, %D%w%S
browseable = No
read only = No
inherit acls = Yes

[printers]
comment = All Printers
path = /var/tmp
printable = Yes
create mask = 0600
browseable = No

[print$]
comment = Printer Drivers
path = /var/lib/samba/drivers
write list = @printadmin root
force group = @printadmin
create mask = 0664
directory mask = 0775

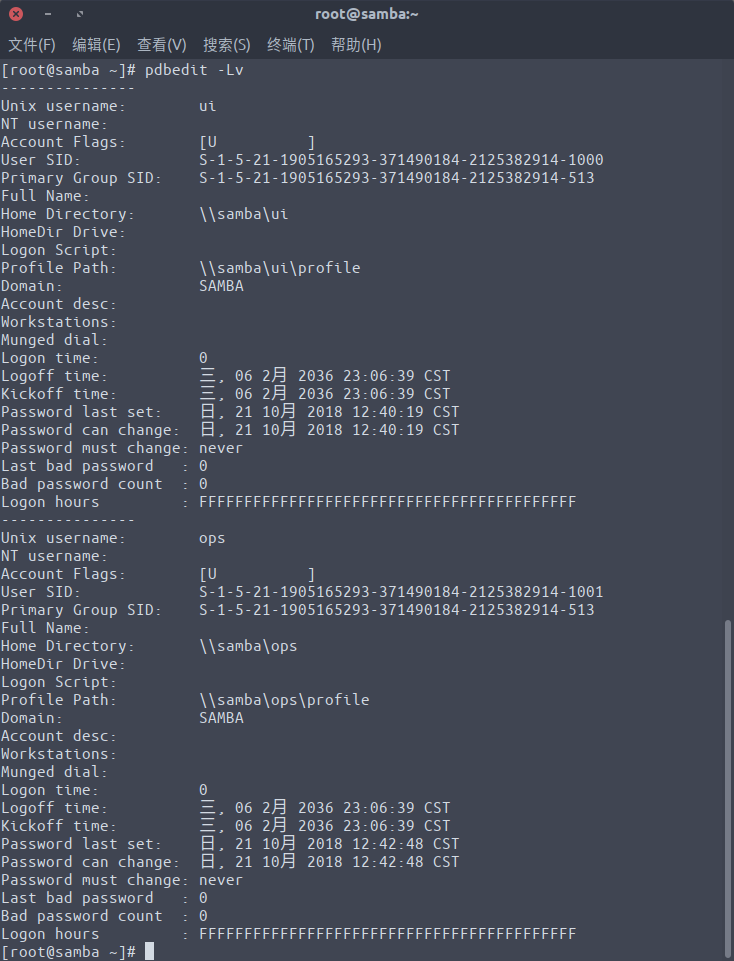
[ui]
comment = ui
path = /home/ui
browseable = yes
write list = ui
writable = yes
read only = no
valid users = ui

[ops]
comment = ops
path = /home/ops
browseable = yes
write list = ops
writable = yes
read only = no
valid users = ops

测试samba用例如下如图

testpram

防火墙放开samba服务端口

1
2
firewall-cmd --permanent --add-service=samba
firewall-cmd --reload

selinux和文件夹访问权限

1
2
3
4
setsebool -P samba_enable_home_dirs on

chown -Rf ui.ui /home/ui
chown -Rf ops.ops /home/ops

查看firewall开放端口信息如图

firewall-cmd

连接测试

windows平台可以直接在支持中输入\192.168.31.250\ui。输入用户名和密码,进入samba目录。测试如图所示,

samba测试
完成连接后,可以在资源管理器中添加映射网络驱动。将共享直接挂载到磁盘目录。

linux,可以在文件管理器中输入smb://192.168.31.250/ui,选择已注册用户,输入用户名和密码,完成连接。
也可以通过挂载来完成文件目录的访问,操作如下:

1
2
mkdir ui
sudo mount -t cifs -o username=ui,password="password" //192.168.31.250/ui /home/yourname/ui

取消挂载

1
sudo umount /home/yourname/ui

挂载后如图片

挂载
所示。

特别注意

在创建共享的过程中,防火墙和selinux这两个是一定要注意的,端口开放,和selinux的权配置会导致访问的权限问题。


centos samba配置
https://ywmy.xyz/2018/10/21/centos-samba配置/
作者
ian
发布于
2018年10月21日
许可协议